Kubernetes: An Introduction to Container Orchestration
In my last two blog posts, we explored virtual machines, containers, and Docker. When we think of containers, another crucial technology comes to mind: Kubernetes.
In this post, I'll explain:
- What Kubernetes is
- How it works
- Why we need Kubernetes
- How to use it in a simple scenario that every software engineer can experience.
A Practical Scenario
Imagine you're building an e-commerce application composed of microservices: Chart, Marketplace, Payment, User, and Comments. You want to deploy each service on a different server. As we discussed earlier, containerization and Docker are suitable for this situation, as each microservice may have different dependencies and tech stacks. Building Docker images and running these microservices in containers is the best solution.
Once you deploy your microservices into separate machines, they need to communicate with one another for your application to function successfully.
The Challenge
Now, you have five microservices running in containers across five different machines, and you need to manage them all to ensure your application runs smoothly.
Note: While five microservices may seem manageable, in a production environment, tech companies often deal with many more, making manual control impractical.
Enter Kubernetes
This is where Kubernetes (k8s) comes to the rescue. Kubernetes is an open-source container orchestration platform that helps you check, optimize, and monitor the containers in your application.
Kubernetes Architecture
In our scenario, each of the five microservices running on different machines is referred to as a Node. The entire system of machines is called a Cluster. The node that has Kubernetes installed is known as the Master Node, which manages the other nodes.
Kubectl is the command-line interface that allows you to manage the nodes.
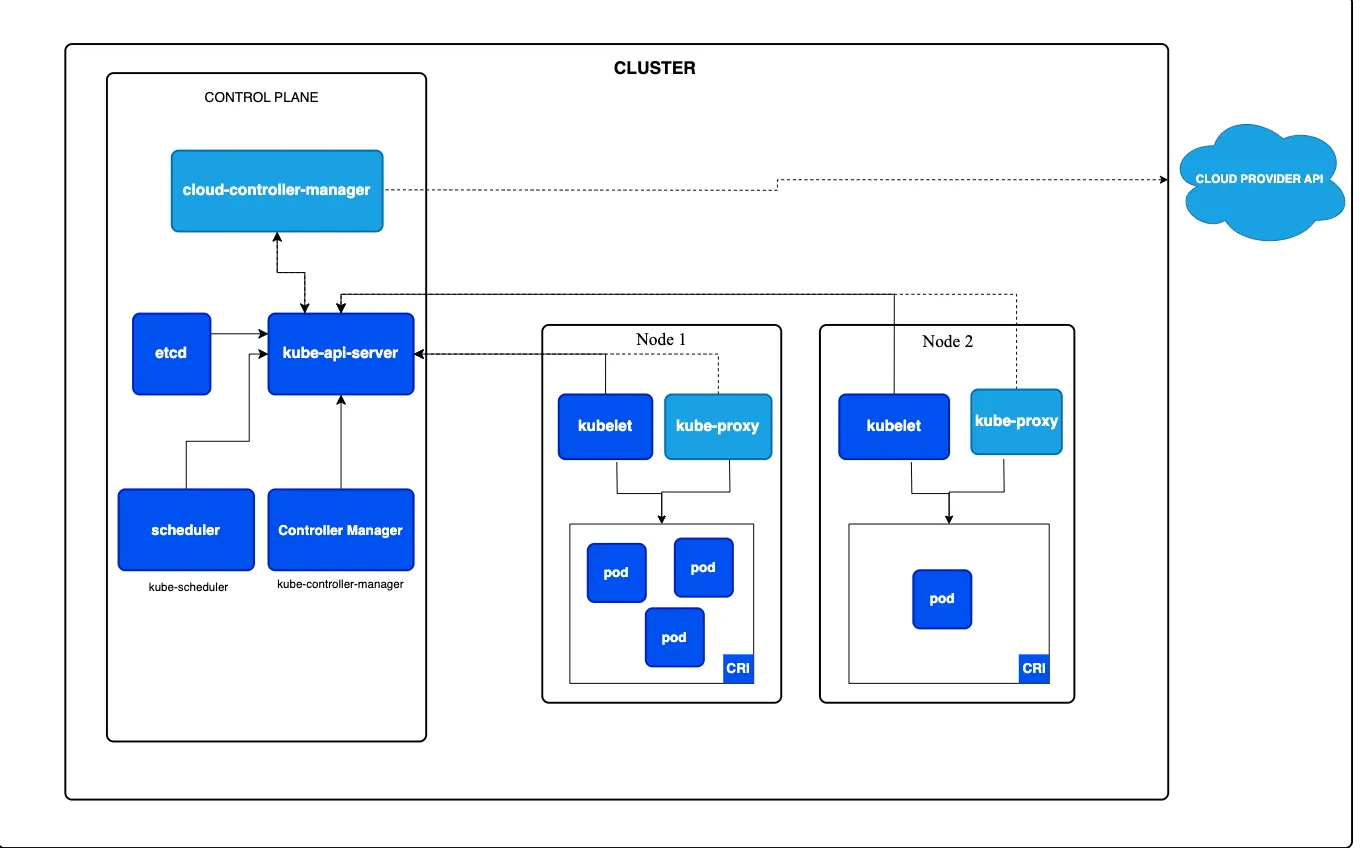
Components of a Cluster
-
Nodes consist of:
- Kubelet: Runs on nodes and manages them.
- Pods: The smallest deployable units in Kubernetes, which can contain one or more containers that share the same network.
- Kube-Proxy: Directs network traffic to available pods.
- Container Runtime: This can be Docker, ContainerD, etc.
-
Control Plane: The brain of the cluster that includes essential components for cluster management, such as:
- Kube-apiserver: Handles requests coming from the Kube API.
- ETCD: A distributed key-value database.
- Controller Manager: Manages different Kubernetes controllers and monitors their status.
- Kube-scheduler: Responsible for placing new Pods onto available Nodes.
Setting Up a Local Kubernetes Environment
Now let's see how to set up a local Kubernetes environment. Remember: practice makes perfect.
Minikube
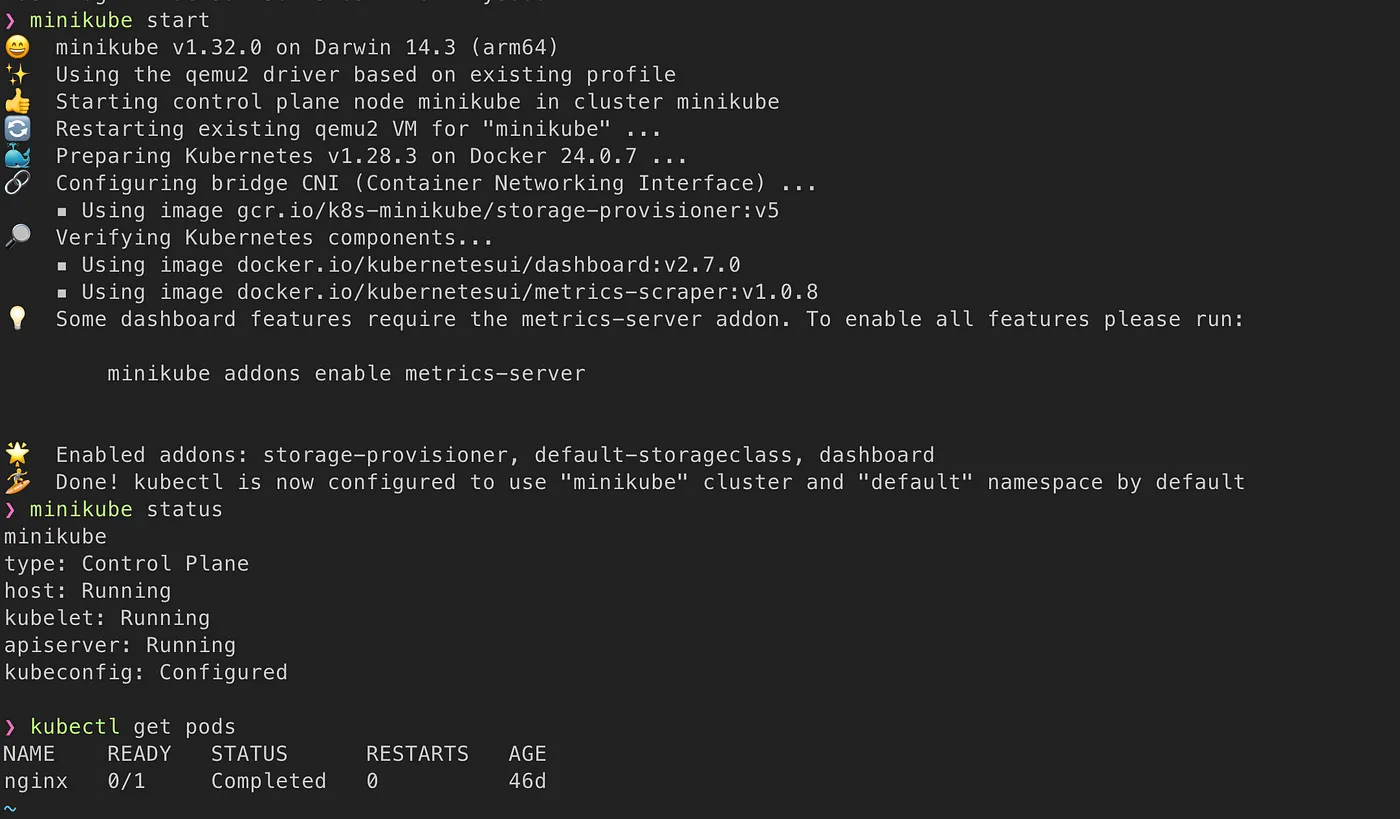
Minikube is a tool that creates a local Kubernetes cluster on your device, designed to help you learn Kubernetes. You can download it from Minikube's official site.
After downloading and setting up Minikube, start the service by running the following command in your terminal:
minikube start
If you don’t see any errors, congratulations! You have a local Kubernetes cluster. But now, how do you interact with this cluster?
Kubectl
Kubectl is the command-line tool for managing Kubernetes clusters. Using the Kubernetes API, kubectl helps you interact with the cluster to perform actions like creating pods, scaling services, and error handling.
You can download kubectl from the Kubernetes official site.
After installing kubectl, you can run this command to see the running pods in your cluster:
kubectl get pods
Conclusion
In this post, we've covered the basics of Kubernetes and its architecture, as well as how to set up a local environment using Minikube and Kubectl. By understanding Kubernetes, you'll be better equipped to manage containerized applications, making your development process more efficient and scalable.